Monday, September 14, 2009

Explosion inside

I shot this picture about a week ago, and didn't bother do write about it since the setup was pretty simple.Still, I've recieved a lot of questions about how I shot it, so here we go.

Idea and setup
Earlier this day I was at work. My colleague asked me to throw a bottle of water to her. I noticed how the water looked, as if it exploded. I thought it would be interesting to freeze that motion. On my way home I bought a cardboard with gold coating which I wanted to use as background for this shot. I was fed up with colorful backdrops, including black or white ones.

I placed the golden cardboard up against the wall and a SB-600 flash on the left side. I put a pillow on the floor in front of the backdrop. I drank up a bottle of vodka and fell asleep. When I woke up the next day, I removed the lables from the bottle and cleaned it with nail polish remover, since it was covered with label glue. I filled the bottle with water almost to the top.


Oops, sorry for including my new Epson 1400 A3+ printer in this setup description...

Exposure
Exposure was pure luck. Ended up with these settings:

Flash: SB-600, 1/8 power, 24mm zoom
Exposure: 1/250@f/8, ISO 200
Camera: Nikon D300
Lens: Nikkor 50mm f/1.8D

Shooting and post processing
I mounted the camera to the tripod and pointed it at the background. I connected the remote shutter cable and held the bottle in front of the camera, allowing it to auto focus on the bottle by pressing the shutter halfway down. I threw the bottle up in the air while giving it a little spin and pressed the shutter. I did shoot only one picture for each throw. I repeated this action about ten times, but I ended up using the first test shot.

This is the RAW file:

Look how unbelievably straight the bottle is.

In Photoshop I cleaned up the background and increased the contrast in levels. Finished with crop and sharpening.

The result:

Explosion Inside

Tuesday, August 04, 2009

Splashism

There are two types of photographers: Those who have shot water drops and those who will.

Idea

Two days ago I saw an episode of Time Warp on Discovery Channel, a program were they slow things down. They are using a high-speed HD movie camera to capture movement with a frame rate of 10,000 frames per second. It's a amazing! Well, in the mentioned episode they shot water drops and I got a few ideas. Here's my shot at it.

Setup

First of all I needed something to pour water in, and it had to be black. I found a deep tray in the oven and put it on the kitchen bench. I also needed a white reflector. In lack of a stiff white cardboard, I glued a white sheet of paper on one of my wife's paintings (on the the reverse side) and set it aslant behind the bench, using a string for support. Next to the tray I placed a Nikon SB-600 flash unit.

I originally inteded to buy a pipette/eye dropper of some sort to make the water drops but luckily I read a tip which would make the shooting process much more efficient. It involved filling a plastic bag with a little bit of water and hanging it above the tray. Then I just had to puncture it with a small needle. This would release a smooth stream of water drops, falling with equal intervals and, more importantly, they would hit the water surface on the same spot - every time.

I mounted the camera with a Tamron 90mm f/2.8 macro on the tripod and connected a remote shutter cable to avoid camera shake. When I pointed the camera against the water, I had to make sure that the field of view stayed inside the reflection of the white paper. A Nikon SB-800 flash was used as a commander for the SB-600 slave flash.

This is how the setup looked initially:


Focusing

The setup was finished, it was almost time to shoot. I was amazed how quickly this was done. It's wasn't very painstaking. But before I could shoot gorgeous water drops I had to lock the focus. Since timing is just as important as exposure (or may be more important) I didn't have time to focus on the water drops each time I took a picture. Most likely, the camera wouldn't be able to focus at all. To configure the focus, I punctured the plastic bag with a needle. The water drops came out about one second apart. I placed a contrasty object (pen with letters) right where the drops hit the surface and focused automatically. Then I switched to manual and the focus would be close to perfect most of the time.

Exposure

The next I had to do was find proper manual settings for the camera and the flash. Highest sync speed for the shutter was mandatory (1/250 sec) and I definitely wanted a narrow aperture to achieve as much depth of field as possible without risking diffraction. Since I was planning to use color filters on the flash, it would be necessary to adjust the output depending on the transparancy of the filter.


Flash: 1/8 power (1/4 for dark filters), 24mm zoom
Exposure: 1/250 sec, f/11, ISO 200
Lens: Tamron 90mm f/2.8 macro
Camera: Nikon D300

Shooting

With a red color filter on the flash, I was ready for the fun part, and believe me: It was a lot of fun. It felt like I had endless attempts to get a good shot. If one drop shot was bad, I just had to wait another second for the next drop to hit the surface. I didn't have to think about how and where the drops were released, which made the shooting process a relaxing piece of work. I could instead concentrate more on the lighting. The first shots looked pretty cool, and thought it would be appropriate to add another flash to get additional colors in the shot.

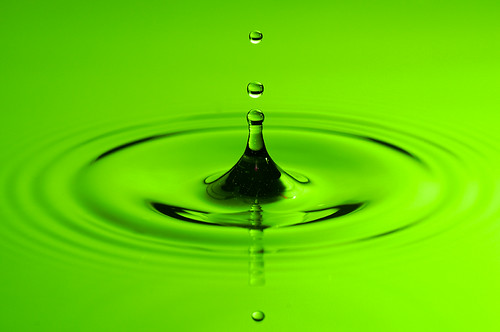
Straight out of the camera (SOOC). Red back lighting.

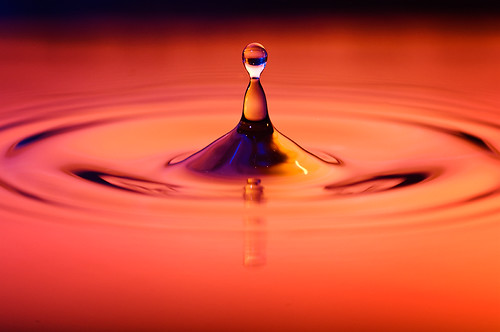
I set up a lightstand on camera left with another SB-600 slave flash and pointed it at the background. Same output as the other slave flash. I used different combinations of color filters on the flash heads. Some combinations looked better than others. I definitely fell in love with the blue-red combo and blue-orange. By setting up another flash, I changed the properties of the backlighting to a color mix/gradient, while at the same time lighting up the drops with a different color.

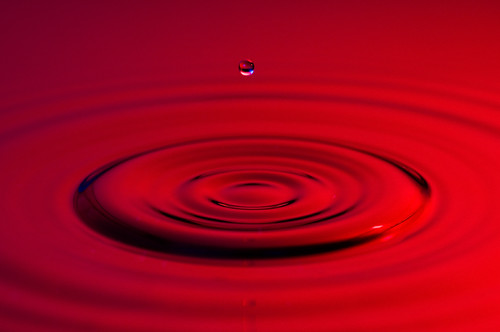
SOOC-raw file. Dual color lighting: Red on the background blue camera left

I did also put the camera closer to the action, but that resulted in an extremely narrow depth of field which rendered the preset focus useless. Still I got some lucky "sharp in the land of the soft" shots.

SOOC-raw file. The closest I could get with the Tamron macro lens. This picture shows the water drop as it bounces off the surface.

Post-processing

Since the colors are so vibrant and shapes are contrasty, very little processing was needed. I only increased the vibrance and contrast just a tad in Adobe Camera Raw. I also removed some tiny dust spots and lens flares. Here are some of the results I'm most satisfied with, in terms of sharpness, colors, lighting and shapes.


Epilogue
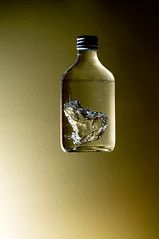
Those of you who are familiar with the Tamron 90mm f/2.8 macro lens know that the lens extends quite a bit when shooting close-up shots. During the focusing prcoess prior to the closest shots, I had to move the lens very close to the water. What do you think happened when the autofocus motor stared pushing the front lens element outward?

This is only a reenactment. No camera lens became wet during the taking of this picture. Only prior to.

Sunday, July 26, 2009

Summer Baby

It's been so long since the last time I wrote a setup article. Our baby is over four months, so I guess I don't have any excuses any more. But there won't be any setup shots this time. During the shooting of this picture I actually forgot to take picture of how it was shot. I will remember that the next time - I promise.

Idea and setup

The weather has been exceptionally nice this summer, or at least this weekend. July started with an average of 6 degrees Celsius, but in the last few days the temperature has been around 23 degrees. Today, the sky was blue, and our boy wore a cute hat. I wanted to shoot a portrait of him against that very sky.

The sun was pretty high, so I definitely wanted fill light. I hooked my Nikon SB-800 external flash to the camera using a coiled cord (Nikon SC-29). I told my wife to grab him under his arms and lift him up while I stood below behind and shot the photos, while holding the flash in my left hand.

Exposure

Since children and wives seldom are patient when it comes to photography, I had to find the exposure prior to the shooing. I wanted the sky as blue as possible, and to achieve that without a polarizer filter, I thought underexposing the sky would do it. I turned the knobs on the camera to manual, and set the shutter to the fastest flash sync speed (1/250 sec). I pointed the camera to the sky and found that f16 was a suitable aperture. Any aperture wider than that would overexpose the sky, so I was balancing on the edge. Due to diffraction I didn't want to use a narrower aperture. ISO was set to the lowest value; 200.

To find a proper exposure for the face, I set the camera to spot metering and set the flash output to TTL (automatic flash exposure). Even if the camera is set to manual, the flash was still dependent on light readings from the camera. By setting the metering on the face, the flash would know exactly how much light to emit.

Shooting

I quickly found out that something had to be changed. The test shots looked dull, the sky was almost white and the quality of the light was nothing like I had imagined. Here are some examples:


The first one is overexposed since I accidentally bumped the thumb wheel, so the exposure was increased with one stop, but the other two don't look any better. The fact that it suddenly started to become cloudy didn't help much. Yes, the boy was cute, but that won't pay the rent. It was time to soften up the light.

There was still a small blue spot on the sky, so I ran inside the house and found a translucent 43 inch umbrella. I hooked it to the flash with the umbrella bracket. I had never held the flash and umbrella in my hand like that.

It was quite heavy working like this. The camera with lens and battery grip weighs about 1.5 kilograms and the flash with umbrella, cord and bracket about the half, but it was windy, so the umbrella got quite heavy. But I found a big advantage doing it like this. I could follow every movement and be prepared for unusual poses. And that happens when shooting infants.

Anyway, I used the same exposure as with the bare flash head, and I feel the result was much more pleasing:

Summer Baby

Since I had to shoot against another spot on the sky, the sky was probably darker, even if it didn't look like that during the shooting. That's why the sky looked so much better on the latter photo. And the quality of the light looks better due to the soft light. In Photoshop I increased the contrast with a slight S-shaped curve and and darkened the edges a little with a vignette.

Epilogue

Do you see the warm glow on the right side of the face? I didn't see that until I looked at the photo on the computer. I wondered a little why that fortunate accident had happened, since the umbrella was located on camera left. I went outside to take a look at the surroundings, and I discovered this yellowish wall, which is the fence connected to our porch:


We stood at this wall during the shooting. It was on my right side. The sun was on my left. The sunlight was probaly reflected on this wall, and gave my son this glow on his face.

Wednesday, March 18, 2009

The reson for the silence

I'm so glad to see a lot of subscribers to my blog! I have so many ideas I want to share with you, but I don't have much time for experimental flash photography these days. On March 7th my wife and I was blessed with a beautiful baby boy and he takes all my time I have.

When I get over the shock that I'm actually someone's dad and things are stabilizing around here, I will start to shoot and write again. I just hope it won't take too much time. If Vincent Laforet can, I can too:)

In the meantime, here's the reason why I feel like the luckiest person alive:

My newborn boy's hand


Friday, February 27, 2009

Great news: Part deux

Today another article I wrote was featured on a website called DIYPhotography.net. I think it's been an honor to contribute to this site, since it introduced me to creative flash photography about a year ago. Prior to that I had know idea that you could use multiple flashes, or even bounce them. DIYPhotography.net really gave me the inspiration to start experimenting with light.

The article on DIYPhotography.net is about how I took this "film noir" shot. It was more difficult than it looks. Click here to read the article.

What, me film noir?


Monday, February 16, 2009

If you can't beat them, join them

This picture is not my idea, but since I saw it the first time, I could not understand how it was shot. Unfortunately I don't remember where I saw it.

While watching TV today, I got a revelation. This post is all about how I shot it.

Setup

First of all, I needed a simple picture of an umbrella. A Google search gave me that. I printed it and glued it to a piece of cardboard. With a sharp knife, I cut out the cardboard in an umbrella shape, and glued it to a piece of white paper. My wife has a lot of scrapbook equipment, so this task wasn't to difficult.


This paper would be the diffuser for this shot, with the umbrella working like a kind of inverted gobo.

I headed over to the kitchen, and set up the camera on a tripod near the kitchen bench. To leave the DoF as large as possible, I wanted to shoot vertically, or at least as much as the tripod would allow. The slave flash, a SB-600, was mounted on a microphone stand so that it would light the bench directly from above. With a teaspoon I made small water drops on the bench where the camera pointed.


The other side:


Exposure

SB-600: 24mm zoom at 1/16 power
Exposure: 1/250 sec @ f/8, ISO 200
Lens: Nikkor 35mm f/2D AF
Camera: Nikon D300


Shooting

I held the paper with the umbrella over the water drops so low as possible, without entering the camera's field of view. I wanted as much of the white paper surface to reflect in the water drops, and since they are curved on top, it required me to hold the paper as close as possible to avoid to many dark areas on the drops.


With the remote shutter cable I fired a couple of shots.

Post-processing

This is the original raw-file:


I quickly realized, after seeing it on the computer, that the umbrella spots appeared too weak. In the raw converter (Adobe Camera Raw) I increased the clarity and constrast, but no luck. I hoped that Photoshop CS4 would help me.

I added a curves adjustment layer and started messing with the curve. I wasn't too happy with the results, until I discovered the little hand symbol in curves box. With this hand selected, I could click and drag any area on the picture, which would make the color tone of that area darker or lighter. By clicking one of the umbrellas, I ended up with this curve (the hand symbol is visible on the upper right hand corner):


I'm by no means an expert in curves, so I doubt I would find a similar curve only by playing with the anchor points. I have been raised to believe that the curve should appear as a nice S, but there are exceptions, especially when my flash settings are way off... 

I finished the post-processing with a crop and sharpening.

The result:

If you can't beat them, join them

Friday, February 13, 2009

Zetson's Valentine Wine (tm)

I'm not going to lie. This shot wasn't planned to be a Valentine's Day photo. All I wanted to do was to shoot a bottle again. Luckily, the first bottle I found was shaped like a heart. It's has been laying around here for years, and today was the first time I actually noticed this shape.

Setup

I did try out several ways to light the bottle with umbrellas. I put one umbrella on each side with a green background, but I didn't think it looked good at all. It may be because of the background, but also the ribs in the umbrellas. They just show too good. I really wanted pair of softboxes! The highlights didn't work with me either. The bottle has a lot of curves in the glass, throwing reflections all over the place. Here are two examples on how ugly these photos looked:


Then I started thinking about lighting the bottle from below, removing the need for umbrellas. I took out a glass plate from one of the kitchen cabinets (that was pretty scary, having Friday 13th in mind...) and put it on top of a cardboard box. I had covered the inside of this box with black cloth to minmize the reflections. In the bottom I put a SB-600 with red color gel and a home-made snoot.


By bouncing the commander flash in the ceiling I could trigger the SB-600 in the box.

As a background I just reversed the green background, and voila, a white background I could do whatever I wanted with. I placed another SB-600 in front of this white paper, also with a red color gel.


Exposure

Backround flash: 1/128 power, 85mm zoom
Box flash: 1/8 power, 24mm zoom
Camera: 1/250 sec @ f/8, ISO 200
Lens: Tamron 90mm f/2.8 macro
Camera: Nikon D300

Shooting

I was completely surprised to see the heart-shape inside the bottle. I knew that the bottle was a big heart, but I didn't expect to get a nice heart inside it. After some trial and error, I found a camera angle that made the inside-heart look most heart-alike. (Has this sentence ever been written before?) Changing the angle and/or camera height just a little would ruin the heart, so I'm glad I found it!

This was the best shot, IMO (the raw file):


I imported the file to Photoshop and increased the contrast a little with curves and removed some of the dust spots and reflections in the glass. Finished with a crop and sharpening.

The result:

Zetson's Valentine Wine (tm)

Happy Valentine's Day!