Tuesday, November 18, 2008

Theory of Relaxitivity

This week's dPS assignment whispered gently "relax".

Getting the idea
For weeks now I've wanted to shoot something which I could cross-process, but so far my subjects have not looked good in offset colors. When I read about the assignment, I got the idea instantly; a dreamy, cross-processed high-key selfportrait of me listening to music. Would it work this time?

The setup
It was time to move my gear out of the computer room to the living room. The spot which I chose for shooting was right in front of the TV set so I had to be quick. My wife wasn't willing to listen to the radio the rest of the evening.

During the clearing of our closet yesterday I found a large white wooden plate. This was perfect for the shot. I placed it on the arm rest on the couch and placed a carboard box underneath on the other side. I mounted a translucent umbrella on a light stand with a SB-600 flash and another SB-600 (backlight) behind the plate (It's hidden behind the camera on the setup shot below):


Here's the backlight flash, pointing upwards along the wall.


I put on a blue color gel. The shot I had in mind would have a slight colored background, so I picked the blue randomly. It turned out to work just fine.

The camera was mounted to a tripod. I originally inteded to shot it myself with the remote, but finding the right head position was EXTREMELY difficult even with a mirror so I had to ask my wife to take the pictures. I took on a headset and layed my head on the plate, right above the couch's arm rest. I also had to place another umbrella under my chin for fill light. Please overlook my feminine pose in the shot below:


Exposure
Finding the exposure was easy in this shot. Similar to my Leaf Diet shot I had to deal with almost white surfaces. Using the histogram on the camera I could increase the main flash's output until the curve ended up right below the over-exposure mark. (You can find an in-depth explanation on this in the Leaf Diet shot above). The output on the back light flash was reduced with one stop lower than the main flash. I also wanted to block out all ambient light, so I chose the max. flash sync speed on the camera:

Final settings:
Main light: 1/8 power at 24mm zoom
Back light: 1/16 power at 24 mm zoom
Exposure: 1/250 sec, f/5.6 and ISO 200
Lens: Nikkor 35mm f/2 AF
Camera: Nikon D300

Shooting and processing
I told my wife that I wanted my head to point directly on the camera and she instructed me accordingly. As mentioned I held the umbrella with one hand, and streched the headset cord with the other. After about 30 shots we got a shot we were pleased with. This is the SOOTC RAW file:


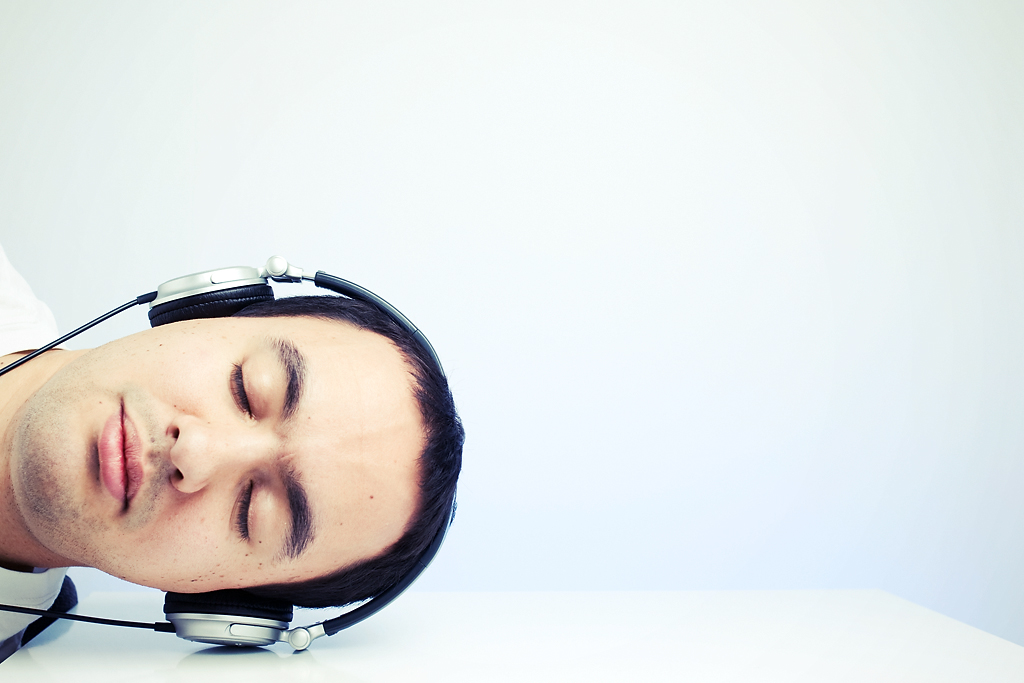
Since the exposure was figured out, I only had to adjust the whitebalance in Adobe Camera Raw.

In Photoshop I adjusted the curve slightly in each RGB channel according to this cross-processing tutorial on the dPS forum. I also had to increase the contrast in Curves, making a slight S-shape, but still leaving it a little faded. I also added a light vignette and cropped it a little.

The result:

Theory of Relaxitivity

Aftermath
The head pose that looked the best was very unpleasant since I had to force my sholder into the arm rest and hold my neck in an awkward position, with both hands occupied. It also felt kind of strange, because it felt like I was looking down on the floor, away from the camera. Of course, the autofocus wouldn't work everytime because my face was too dark and the AF illuminator wouldn't light up. I had to keep my head still in an uncomfortable position for "long" periods of time to get the shots. So, even if the picture depicts "relaxing", the circumstances was not relaxing at all. It actually wore me out, giving me a nasty headache... This is another example that pictures don't always tell the truth.

Another "fun" fact: While I was processing the photo, I noticed that my wife was wandering back and forth, looking for something. I didn't bother asking since I was so occupied. After the editing was finished I walked back to the living room to take the setup photos. After sometime I just had to ask my wife what she was looking for. It turned out to be her wallet.

I had to plead guilty at once. In order to get the wooden plate horizontal, I had to build up a support of a cardboard box, some books and a.... wallet.


Sunday, November 16, 2008

Warhol's Light Bulbs

I didn't plan to shoot light bulbs so that they looked like an Andy Warhol creation, but when you don't have a plan for your work, you just got to accept whatever result.

Getting the idea
I thought the Still-life set on my Flickr stream needed a little punch in terms of colors. I have a couple of cloth backgrounds with different colors and wanted to use them. Of course I needed a foreground object as well and the first thing I found was a light bulb. Fair enough.


The setup
I placed the 40 watts light bulb in the midde of the room and hung a cloth background about 1 meter behind it. I pointed a SB-600 at the background, placing it as close to the light bulb as possible to avoid shadows on the background caused by the uneven background cloth (no, I didn't do any ironing this time either). I mounted the camera as close I could get on a tripod and connected a remote control.


Exposure
The problem was that the light bulb was too bright. At minimum x-sync speed shutter at 1/250 and f/45 I got a pleasing shot of the inside of the light bulb, but I didn't get any background color. The SB-600 was just not powerful enough.

But after connecting a IKEA dimmer things changed to the better. Using the lowest setting on the dimmer I could open up the aperture a lot, making the flash useful again. I reduced the flash power to 1/8.


This is the edited version of the photo.

Light bulb

I thought it was an OK shot, but not as colorful as I wanted it to be. So I moved the camera to get the whole bulb within the frame and rotated it to portrait orientation. Since it wasn't as important to get the whole tungsten thread in focus I could open up the aperture even more and reduce the flash power again.

Final settings:
Light bulb: Minimum power, according to IKEA
Flash: 1/128 power at 24mm zoom
Exposure: 1/250 @ f/4, ISO 200
Lens: Tamron 90mm f/2.8 macro
Camera: Nikon D300

Shooting and processing
I shot one shot of the light bulb with a different background for each. It was during this I started thinking about Andy Worhol's work (collage of the same object in different colors). I did a reshoot, making sure that the camera didn't move. As mentioned I used a remote control for extra protection.


With four images of the same light bulb with different colors I imported them to Adobe Camera Raw and increased the exposure by 0.7 stop. The only editing I did in Photoshop was cropping, cutting and pasting (and a whole lot of cloning to remove the speculars from the commander flash on the camera, but that's another story).

The result:

Warhol's Light Bulbs

The coloring could easily been done in Photoshop too, but it was kind of fun to this the hard way, like Warhol:)

Wednesday, November 12, 2008

Somebody, light a match!

Since Christmas is just around the corner, I thought I'd do something a little bit different. I wanted to shoot a lighting match in its most dramatic stage. I thought I had to use at least one strobe initally since I was uncertain how bright the flame would be. But no.

The setup
I understood that in order to focus properly on the match, I had to attach it to something. I found a small clamp and fastened it to a heavy object that would withstand the pressure while the match was lit. It actually took some time before I realized the logic behind this "heavy object":


Yes, it was a fire extinguisher! That made this whole situation much more comforting. Only problem would be that the extinguisher caught fire first, making it unusable, but I didn't have time to worry about that. I was here to shoot pictures.

I sat the camera on a tripod and attached my new remote control. This was pretty much it.


Exposure
I often get tunnel vision when I find something interesting. That happened during this shooting. During the shooting of the first match, I was so caught up in looking at the result on the LCD-screen that I completely forgot that the match was still on fire! By the time I found that out, the match had melted the plastic coating on the clamp... Luckily, I had several of those:)

Until now I haven't put the D300 to the extremes. This time I finally did. By trial and error I found that I could go as far as the fastest shutter speed possible! That also meant increasing the ISO to the max and using a pretty wide aperture. Still most of the sparks would be appear with motion blur. During the test shooting I had to narrow the aperture a little because of the extremely shallow DOF, but the exposure seemed fine.

Final settings:
Strobe: A 1 inch match firing at full power
Camera: 1/8000 sec @ f/6.3, ISO 3200
Lens: Tamron 90mm f/2.8 macro
Camera: Nikon D300

Shooting and post-processing
I focused on the match manually, swiped the match with the matchbox and pressed the remote shutter in burst mode (about 6 fps on the D300). Changing the match everytime was a bit tedious because the handle on the fire extinguisher was curved, making it difficult to fasten the clamp.


After 112 shots and seven matches I found a kind of interesting shot. This is the untouched RAW file:


In Adobe Camera Raw I only reduced the noise, which was definitely needed at ISO 3200, even on a D300. In Photoshop I cloned out the flares on the right side of the flame. I also adjusted the levels just a little bit and burned the head of the match (as if it wasn't burned enought in the first place...). I ended the post-processing with a square crop and rotation.

The result:

Somebody, light a match!


Wednesday, November 05, 2008

Red socket

I hadn't shot anything during the past two weeks and I was desperate. I had to find something to light up with my strobes.

Getting the idea
I searched the tool shed and I found a rail of deep sockets. Nothing special about that, but one of the sockets had a red cap and I still don't know why. Either way, I thought it looked as a nice focal point and I wanted to do a high-contrast tool shot.


Setup
I wanted a "grungy" background so I placed the sockets on top of a small toolbox which had a rusty surface. Soft lighting was out of the questions so I snooted a SB-600 and pointed it at the rim of the sockets. I realized that this would create a black area on the other side of the sockets, so I did the same thing on the opposite side.


I wanted to use the Sigma 70-200mm f/2.8 macro lens which has a minimum focusing distance of 1 meter. I had to climb a ladder to get high enough.

Exposure
The Sigma lens is quite soft at 200mm so I had to turn it down to 170mm which is the longest focal length that this lens stays sharp. Focusing at the minimum distance at this focal length gives a very narrow depth of field, so I chose f/8 to stay safe.

Both strobes: 1/64 power, 24mm zoom (SB-600)
Exposure: 1/125 sec @ f/8 ISO 200
Lens: Sigma 70-200mm f/2.8 macro @ 170mm
Camera: Nikon D300

Shooting and processing
Even though I used an aperture of f/8 the slightest movement brought everything out of focus. Using the tripod was unpractical so I took quite a few shots just to be sure that at least one stayed perfectly sharp (or at least as sharp as the Sigma gets....). I also had to re-arrange the sockets a couple of times for a more "tidy" look. From about 15 shots, this was the best (SOOC RAW version):


Once again it was a little bit underexposed, but instead of adjusting the exposure which can lead to increased noise, I increased the brightness in Adobe Camera Raw, and it looked better. In Photoshop I duplicated the background layer, desaturated the new layer and changed blending mode to Overlay. Reduced the opacity to 70%. This gave me a high-contrast look. The red cap faded a little so I brought it back with Selective Color. Adjusted the Level gliders and added a vignette. Finally I cropped it, which was really needed. A square crop is the only way to go with this kind of shape, IMO.

The result:

Red Socket