Monday, September 15, 2008

A very thirsty rose

Today I wanted to use my strobes again. I had planned to take them outside for some on-location shooting, but my model wasn't available so I'd try a still-life shot (again).

First I tried to shoot some water shots (things falling in a bowl of water, water drops etc) but I didn't have a large enough glass containter for the shots I had in mind. Then I took out some colored glass-vases and lit them from above, from the side and below, but the results weren't pleasing. (Maybe one of them got a little interesting, but I'll describe it in another post).

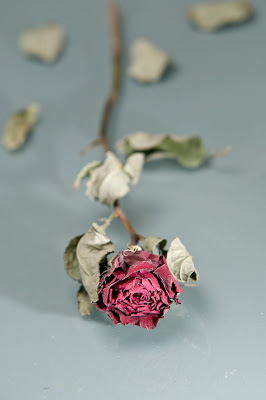
I was about to call it the day, when I discovered a bouquet of dry roses hanging on the wall. I don't like to shoot flower shots if they don't have a story, but I thought I could make one with a dry rose. Hoping that my wife wouldn't get mad, I out one rose from the bouquet. Last time I took a rose from her, she wasn't too happy...

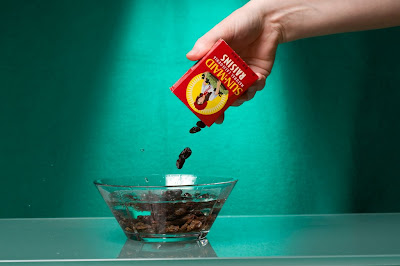
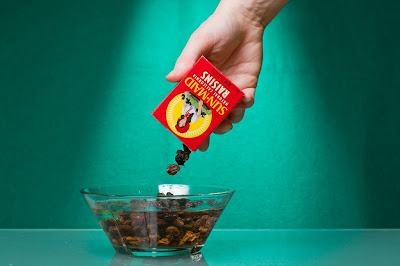
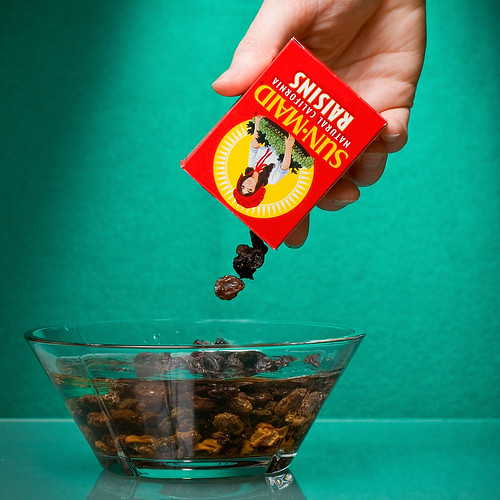
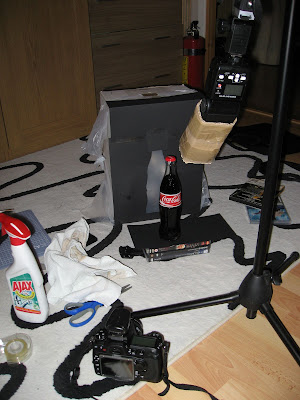
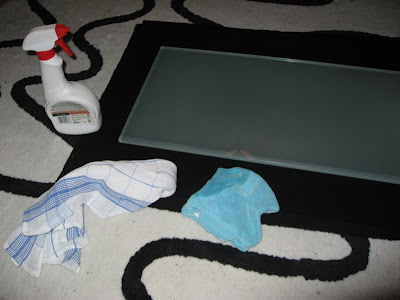
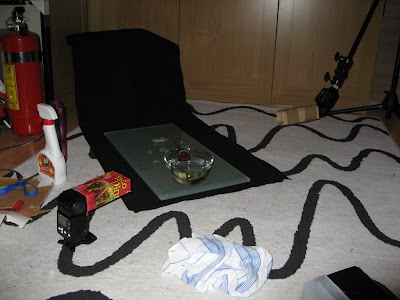
As I mentioned, I didn't have any plan for how to shoot this rose, but reglardless I needed something to put it on. I took out the glass plate I used in the raisin shot and wiped it clean. This is very important. Dust and fingerprints does not look good during a strobe attack, so keep it nice and clean. The black cloth was used for background.


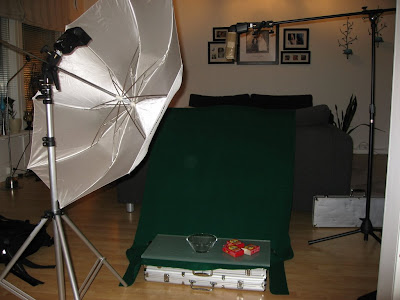
I put the rose on the plate and mounted an umbrella with SB-600 on camera left and a bare strobe on camera right for fill. Here are some straight-out-of-the-camera (SOOC) examples:


So what did I learn by taking these three shots?
  • Soft light is not suited for a dry rose. I thought it looked too boring and needed a little punch. So I decided to snoot both strobes to create some strong shadows.
  • The rose just laying there was pretty boring, so I removed it leaves. Still a little boring. A bowl of water was standing right next to me (after the water shot attempts in the beginning) and I thought that a dry rose might want to drink water? Finally I had the story I was looking for!
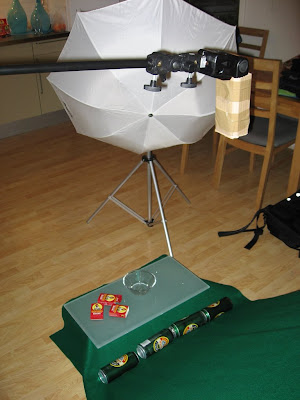
I removed the umrella, put the flash on the floor (to create longer shadows) and made a new Taco Dinner cardboard snoot for the camera left strobe which lights up the rose. This is the final setup:


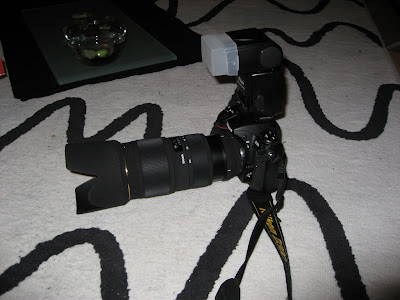
The reason why the flash to the right is upside down is because the light sensor for remote triggering is closest to the camera. I was too tired to experiment with manual flash output and relied only on TTL... 

After some test shooting, I came up with these settings:

Right strobe: SB-600 85mm zoom, TTL -0.7
Left strobe : SB-600 85mm zoom, TTL 0.0
Lens: Sigma 70-200mm f/2.8 @ 102mm
Exposure: 1/250 @ f/5, ISO 200


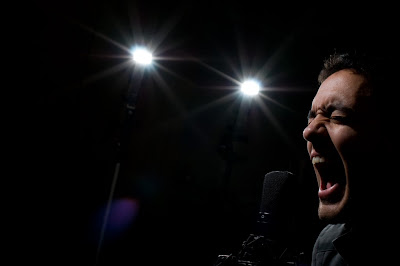
Finding the right angle and crop was so hard. I was extremely tired, my wrist was hurting and was pretty much fed up with photography due to all the failed attempts earlier this evening. I had never aborted a strobe photo shoot without a result and I certaintly did not want this to be the first. After about 50 shots, I got a shot that I was pleased with.
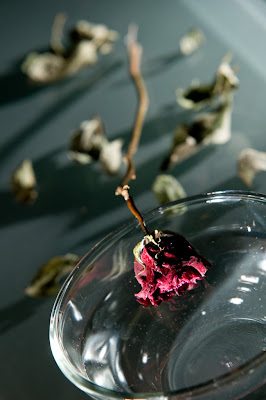
The SOOC version:


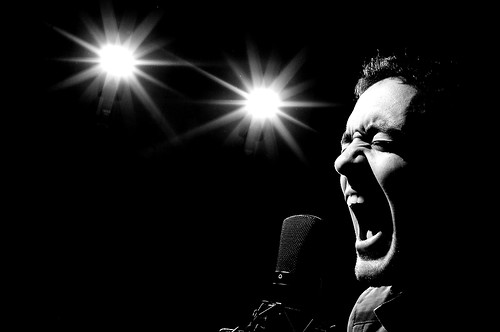
This was done in Photoshop:
  • Added a vignette
  • Desaturated the reds a little
  • Levels adjustment
  • Removed some of the shadows on the rose (don't tell anyone, OK?)
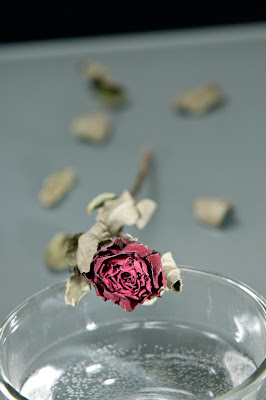
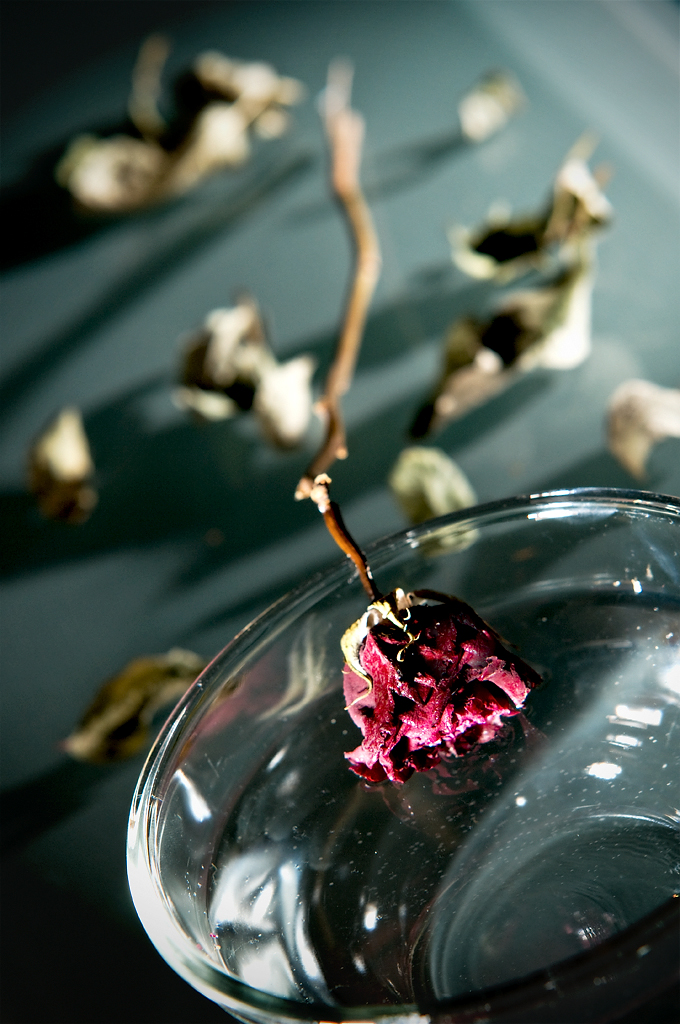
The result

A very thirsty rose

After I was done shooting, I had ask my wife why the 3 roses was hung on the wall. She said that they were the roses she gave me on our wedding day...(ops!) When she asked why I wondered about that, I had to tell that we had 2 beautiful roses left...

The next post will be titled "Why photographers need to know a marrige counsellor".

Tuesday, September 09, 2008

Contre-Jour Amour

This week's assignment on dPS was "Contre-jour". That is French for "against the light". The assignment description said that this "exploits lighting and plays with under and over-exposed areas to create a dramatic effect - in other words, the complete opposite to HDR approaches, which try to compress the range of contrast".

I was unsure what to post to this assignment since there were A LOT of different opinions on what this really means. A majority of the submitters wrote in their post that they weren't sure if their photo was correct.  The disscussion went on and on. I'm looking forward to see the winners, which will give us a clue of what "contre-jour" actually is:)

Anyway, taken the description above into account, I wanted to use my strobes again. After a couple of days with thinking, I came to think about those classic low-key concert photos, which has a lot of dark (underexposed) areas in addition to stage lights (overexposed) with the artist as the focal point. These photos, at least those I'm thinking of, has a very high-contrast look, which I wanted to recreate.

Unfortunately, I didn't have a stage. Only a small computer room. I mounted three SB-600's in a row wich would function as the backlights. And my last Speedlight, the SB-800, would fill the artist with a snoot. I had to fire all these with Cactus triggers. I mounted the microphone on the microphone stand and did a test shot. To my big surprise, it appeared like one of the Cactus recievers had a malfunction. It triggered the flash constantly and actually drained the battery of the connected Speedlight... (RIP, that one Cactus reciever)

So, since I didn't have enough Cactus triggers left, I had to use the SB-800 on the camera as a commander, and could only use two instead of three stage lights, since I had to use one as a snooted fill flash.

Finally, after some modelling, the setup ended up like this: 


My wife sat to the left in this setup shot and pointed the camera on the stage lights. After some testshots, I ended up with these settings (all-manual):

Backlight: 1/64 power at 24mm
Fill flash: 1/8 power at 24mm (forgot to set it to 85mm...)
Camera: 1/200 at f/9 *)
Lens: Nikkor 35mm f/2D AF

*)I recently read that in order to get a star-shaped sun, use a narrow aperture. I'm glad I read that, because that is the effect I wanted in this shot.

What was important to me was the right facial expression in addition to the composition. I didn't have a specific plan. I just told here to twist and turn the camera for each take. Halfway in the shooting I found out that I couldn't pretend that I was singing. I actually had to scream loud to get that intense look... After 30-something shots I got one that both she and I was pleased with:


Then I had to walk into the digital darkroom. After increasing the blacks and exposure in Adobe Camera Raw, I imported it into Photoshop to add a gradient map adjustment layer. I think this is the best way to do a high-contrast B&W conversion. I also had to erase some lens flare and a part of the light stand in the background. I felt that a little recomposing was needed too, which was very easy to perform due to the large black areas:)

The final image after editing:

Contre-Jour Amour

"Contre-Jour Amour"

What I could have done differently:
  • I could have tried to light my face from different directions to see if I got some interesting shadows.
  • Tried narrower aperture to create bigger "stars". When I increased the blacks in processing, the stars got smaller.

Sunday, September 07, 2008

How grapes are made

When I was about to leave work yesterday, I found a raisin in the sink. It had been there for some time, so it was soaked in the water. It had expanded and actually looked like a small grape... It was this discovery that gave me the idea for this shot.

I bought a couple of boxes with raisins on my way home (my first time ever, I hate raisins) and thought about how to shoot it. My kitchen bench is well-shot so I wanted to try a different background. I knew that red often fit well with green, so I found a piece of green poker tablecloth and hung it on the couch. Apparently, I was in a poker mood because I also used some pokerchip cases to lift the glass plate to create some distance from the edge of the plate to the bakground (see photos below). The beer cans (also poker related:)) were used to stretch the cloth.


The strobe setup
A snooted Speedlight for background light was mounted on the microphone stand, pointing downwards. This is to separate the subject from the background. For the main light, I used a Speedlight in a translucent umbrella above camera left, pointing down on the bowl.

After a couple of test shots manually, I ended up with these settings:

Background flash:  1/32 power at 85mm
Main light: 1/4 power at 24mm
Camera: 1/200 at f/8, ISO 400 (I forgot to set it on 200....)
Lens: Nikkor 50mm f/1.8D AF

I tried different apertures. The 50mm works best on medium apertures (f/4-8). I wanted a large aperture as possible to blur most of the background because the tablecloth's surface was pretty rough. Still I ended up with f/8 to get all foreground details in focus. The background wasn't blurred as much as wanted, but sometimes you'll have to deal with compromises.

For the first time I remembered to shoot the excellent grey card that was inluded in on of Scott Kelby's Photoshop CS3 books. By using this I can get a perfect read-out of the WB and use this temperature value in the other shots. On this grey card, the Adobe Camera Raw WB reference is on the top right quadrant.

When I clicked on this quadrant with the WB tool in Camera Raw I got 5640 Kelvin and tint +4. I copied this setting to all the other shots and voilĂ : Perfect WB. Highly recommended for ALL photos!

I asked my wife to pour the raisins in the bowl. I wanted the box and her hands inside the frame while the raisins were shot falling into the water. This was much more difficult than I expected. Since I'm a raisin novice, I didn't take into account that the raisins are sticky. So the raisins came out of the box in an uneven pace. But I just continued to shoot, and after three boxes I finally got a shot that I was pleased with (photo below). (That's way the bowl is almost full of raisins in the final shot:))

Unfortunately, I wasn't happy with my wife's hand and arm position. They didn't look as "relaxed" as I had in mind and I wanted it to enter the frame from above... So after a total of five boxes of raisins, it came out like I wanted (below):


I had to do some post-processing on this final shot. I ended up with a square crop and had to increase the greens and reds. There was also a specular on the bowl that I cloned out. Added a slight vignette.

The result:

How grapes are made
How grapes are made

What I could have done differently:
  • The thing I'm least happy with is the dark shadow on the left on the background. I should have centered the bowl in this cone of light that was created. I feel that it's a bit distracting and that the picture is unbalanced because of this.
  • Instead of snooting the background flash I could have tried to put a flag between the flash and foreground, so that the background light would be more even.
  • Since I ended up with a pretty tight square crop, I could try to increase the space between the background and foreground. In this way, the background would become more blurry.

Saturday, September 06, 2008

Beetle in the woods

I regulary use to drive around in my small town to see if I find something interesting to shoot. A couple of weeks ago I came to think about an abandoned Beetle which almost had become one with the forrest. I drove up there with my lighting gear, just in case.

It was pretty dark and the car was unconveniently situated among rusty scrap iron and dry sharp branches. I brought one translucent umbrella (which I almost tore apart on on of the branches!) with light stand and the camera with 50mm along with the SB-800 and SB-600. There was a lot of mosquioes there too. Since I wouldn't be there for too long, I decided to just shoot with CLS to avoid a lot of test shots.

It was difficult to find a shooting location. I wanted to shoot the interior of the car since every thing was removed and the floor was a part of the forest floor. The 50mm is also considered a short tele lens (I didn't have the 35mm at that time) so going inside the car was out of the question.

I finally ended up shooting forward through the back window. I placed the umbrella on the left side of the car to create a bright point on the dashboard.

The setup shot:


I chose a medium aperture in Aperture priority to emphasize the focus on the dashboard. 

Settings: (SB-800 on-camera was used to trigger the SB-600 slave)

SB-600: TTL +1.3
Exposure: 1/60 at f/4
Lens: Nikkor 50mm f/1.8D

The final shot:

The happy Beetle

Coca-Cola bottle, part 2 of 2

Ok, so I wasn't too happy with the last Coke shot. It was Tuesday night, and I had to wake up early the next day. I knew it was a bad idea, but I just had to take a new shot for the Weekly Assignment: "Product Photography" at dPS.

Earlier that day a fellow photographer, Rob Necciai, told me he got an interesting effect by placing a strip of cardboard in front of his softbox (picture), thus to block out unwanted light. I didn't have any special ideas for my next Coke shot except that I wanted a backlit subject, and I definitely wanted to try this gobo thing

I started cutting a hole in some black cardboard that had the shape of a Coke bottle. I placed this in front of my DIY softbox and placed a SB-600 inside it. The bottle was placed on black cardboard on top of some DVD covers. Did some test shots to set the camera and flash output. During these shots I found out it was extremely important to line up the gobo, bottle and camera perfectly. Since the gobo was shaped like the bottle, small variations in positions was very noticable since the width of the edge light changed. I also had to block the hole on the top. I thought that the light passing throught the top of the bottle was too intense.

When the test shots were complete, it was time to light the label again. In the last Coke shot I made a mistake by using a reflective umbrella to light the whole bottle and more. By now I had also decided to make this a low-key shot, so I made a DIY snoot for the label flash so that I could focus the light beam on just the label. In the last Coke shot I got ugly reflections from the bottle and label when the light came from the side, and I was happy to see that lighting the label from above (45 degrees) worked great! I mounted the snooted SB-600 on a microphone stand to get it just over the camera.

After the test shots were complete, I ended up with the following settings:

Softbox flash: 1/32 power at 24mm
Snooted flash: 1/64 power at 24mm
Lens: Nikkor 35mm f/2D
Exposure: 1/125 at f/8 ISO200

The setup looked like this:


I sprayed the bottle with water, and noticed I had to be fast so that the water didn't soak the label.

The final shot:
Cokey Low-key

The only PP I did on this was to increase the saturation and straightening in addition to the RAW processing. I'm quite happy with this shot.

What I could have done differently:
  • I wonder if I actually had to cut the gobo with the shape of the bottle. Maybe it would be enough to just make a narrow rectangular slot. I will try that later.

Friday, September 05, 2008

Coca-Cola bottle, part 1 of 2

I'm a big fan of dPS (Digital Photography School), which is a blog and forum dedicated to photography. I started using this in my early days when I mostly took snapshots, that is december 2007... During the last six months I feel I have learnt so much from this site, especially the forum.

Each week, theres an assignment called Weekly Assignment at dPS, where a specific theme is given and you have to shoot accordingly within the specified dates. I try to post a photo every week, and the last assignment was "Product Photograhy".

What I wanted to try was a bottle of Coke in a bed of ice cubes. Since I can't buy ice cubes around here I had to fill about 20 ice-cube bags and put them in the freezer the night before (I also had to make room for them in the small freezer, but that's another story).

The idea was to put all the ice in a see-through container and a speedlight below with a blue color gel, just to get that cool look. Unfortunately the blue color gel was just too dark so that no light passed trough the coke, resulting in a silhouette of a bottle laying on blue ice. Lighting the bottle with an additional flash didn't do it either because the bottle appeared too dark.


Therefore I dropped the color gel idea and went for a normal colored ice bed, since the red color of the cola looked more like the one I had in mind. The label was of course too dark and put up a reflective umbrealla on the right side with a white umbrella on the left for fill. This is how the setup looked in the end:


The strobe on the floor is set on 1/16 power at 24mm and the one on the reflective umbrella is at 1/64 at 50mm. Camera settings: 1/250 and f/10 at 50mm, ISO 400 (forgot to set it down to 200...)

The final image:
Coke on the Rocks

What I'm not satisfied with:
  • I should not have used the reflective umbrella. I should have snooted the label flash so that only the label would be lit. The reflection on the label and bottle was a little to harsh IMO. I could also have put the label flash on the other side of the container (camera "top") to eliminate the reflections.
  • The cola liquid is floating in the whole bottle, which makes it evident that the bottle is in a horizontal position. I don't think it look quite good after I noticed that.

I posted this photo for the assignment, but wasn't too happy with it. I tried to shoot another Coke shot, and I think that result was much more pleasing:) That will be the next post.

Zetson

Introduction

I'm zetson. I'm very interested in photography and have found it's a very expensive hobby... My list of equipment have grown and grown the last six months and think it's enough right now. The list looking like this as we speak:

Nikon D300
Sigma 10-20mm
Nikkor 35mm f/2D
Nikkor 50mm f/1.8D
Sigma 70-200mm f2.8
Three  Nikon SB-600's
SB-800
Two  translucent 42" umbrellas
One 45" reflective umrella with silver lining
Two light stands
Cactus triggers and recievers

A couple of weeks ago I found the big advantage of shooting manual (both camera and flash). Before that I relied only on aperture priority in the camera and CLS for controlling the flashes. Even though CLS is short for "Creative Lighing System", I feel that I can be more creative controlling everything manually.

The reason why I created this blog is to show you how I use this equipment to create different types of effects with a strobe setup. This is pretty much a technical diary for myself so that I have a reference of what settings that were used, but I would be glad if this information can be helpful for other strobists too:)

Zetson