The idea
As the time went by, I forgot about this idea. Partially because I didn't know how to do it and because I have been caught up in shooting bubbles and leaves. Yesterday, while I was at the grocery shop I discovered a rack of confectioner's coloring. Red, blue, green, yellow... Perfect! And they were cheap too. I bought one bottle of each, thinking that should be enough. Little did I know...
The setup
I filled a rectangular vase with water and placed it on the kitchen bench. On the wall behind it I taped a white sheet of paper as background. I put a SB-600 on the left side of the vase, pointing it on the paper. Mounted the camera on a tripod as close I could get (about 1 meter), with the 70-200mm f/2.8 macro lens attached. Filled the vase half full with water.


I wanted to drop three colors in the water at the same time so I had to arrange the color bottles in a rack with tape.

Focusing
I had to find a way to lock the focus inside the vase. I planned to use a narrow aperture, but getting so close with a long focal length doesn't give much playroom in the depth of field (DOF). So focusing on the vase itself wouldn't work. I took two drinking straws and made a T out of them. I hung this T on the vase, which gave me a focus point in the middle of the vase. I auto-focused on the vertical straw and switched to manual focus. This way, I didn't have to care about focusing while the colors unfolded their beauty.

Exposure
As mentioned, I wanted a narrow aperture to get as much as possible in focus, since I couldn't foresee the movement of the colors. I needed a relatively high shutter speed to freeze the motion. My plan was to shoot in burst mode, which means 6 frames per second on the D300. In order for this to work I had to use the smallest flash output usable for the camera settings, which would ensure fast charging times and at the same time getting a completely white background. Prior to this photoshoot I thought over-exposing the background would work well, since I've done that several times before. I discovered quickly that I could do that in this shot since the colors are exposed by that very same light. Over-exposing the background would also over-expose the colors, resulting in blown-out colors. Using the histogram on the camera I quickly found some appropriate settings with a low flash output:
Speedlight: 1/64 power at 24mm zoom
Exposure: 1/160 sec, f/10, ISO 200
Lens: Sigma 70-200mm f/2.8 macro
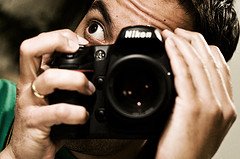
Camera: Nikon D300
Shooting
I held the color containers on the edge of the vase while pressing my other finger on the shutter and poured the liquid in the water. This was much harder than expected. The movement of the colors was pretty random and most importantly, because of the nozzle on the bottle and density it was pretty diffucult to pour the color fluid out of all three containers at exactly the same time, which the following montage clearly shows (these shots were shot before I zoomed in closer on the vase)
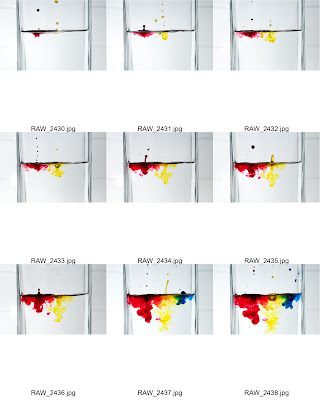
I wanted three more or less identical flow of colors and this lead to a lot of work. Every time I had shot a series of photos, I had to empty the vase for contaminated water, wipe it completely dry, fill it with excacly the same amount of water and lock the focus with the drinking straws. I shot about 10 series, so I spent about two hours at the kitchen bench, doing mostly this:

The reason I had to quit was that two of the bottles got empty and the grocery store had closed.
Post-processing
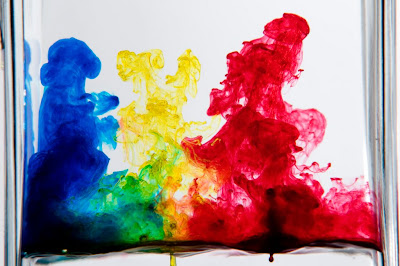
After I had uploaded the photos (1,8 GB of RAW files) I found one - 1 - shot that looked pretty interesting. This is the straight-out-of-camera RAW file, obviously turned upside down:
If you look closely on the white background there is a gradient going from white on the right side to almost 50% grey on the left side. I had no idea why this had happened, since I was exposing the entire visible background. Looking at the vase answered my question: the vase was rectanguar, but the glass itself had a slight planoconvex shape seen from above (I know, I have never heard that word before either, but thanks to wikipedia, I know now). The picture below shows an exaggerated illustration of the vase.
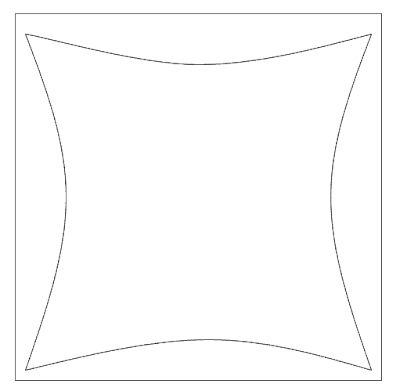
Have you seen this shape before? Do you know what a lens is? Exactly, the vase was a lens. I suspect that was the reason why I got the gradient background. I also got some chromatic aberration which I haven't seen on the Sigma lens before. The planoconvex shape on the vase was also a good reason for not focusing on the vase itself, but on the drinking straw.
Enough ranting, moving on: I didn't do any adjustments in Camera Raw except for WB. I imported it to Photoshop and used the Curve tool to fix the background which I wanted to be completely white. I sat the white point on the darkest area on the background, which made the colors look blown-out. Then I adjusted the red, yellow and blue sliders in Selective Colors to bring back the colors again. Adjusted the contrast and crop a little. Sadly, I had to do some cloning to the left of the blues because of the reflections in the glass.
When this article was written, I didn't have the JPG file of the final image. Only the PSD file which I couldn't convert due to strict policy rules on the computer at work. Thankfully, two members on the dPS forum were more than happy to help me to convert this PSD file to JPG so that I could upload it to Flickr. I promised to credit them in this blog:
JimnyClickit and Fletch,
JimnyClickit started helping me at first with a head start, but Fletch quickly took the lead since JC was using a dial-up connection with about one hour download time on the 13 MB PSD file, while Fletch used a whopping 3 minutes:) Anyways, thank you both!
The final image
Color Peaks
Conclusion
Well, I got to finally take pictures of colors in water, but I'm not sure I'm very pleased with this attempt. I was hoping I could get a "cleaner" looking photo. Instead I got a grungy look that almost looks like painting on a piece of paper. I will definitely try this again, may be experimenting with only one color. But in the end, it was funny to have tried it, and some lessons are learned. Getting a vase that's not a lens, trying different ways to light the subject and other backgrounds.


3 comments:
I will your work flow and detail explanation of the setup. Thanks for sharing.
Ha,Ha. On my computer your "final image" is missing!! but it is all OK on your Flickr page.I enjoyed the right up Zetson.
I have a similar vase to yours so it is good to know that distortion will occur if taking photo’s through the glass.
Thanks for the info - always nice to see people share their process.
Post a Comment