I shot this picture about a week ago, and didn't bother do write about it since the setup was pretty simple.Still, I've recieved a lot of questions about how I shot it, so here we go.
Idea and setup
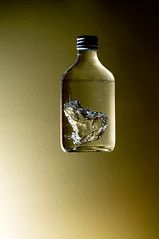
Earlier this day I was at work. My colleague asked me to throw a bottle of water to her. I noticed how the water looked, as if it exploded. I thought it would be interesting to freeze that motion. On my way home I bought a cardboard with gold coating which I wanted to use as background for this shot. I was fed up with colorful backdrops, including black or white ones.
I placed the golden cardboard up against the wall and a SB-600 flash on the left side. I put a pillow on the floor in front of the backdrop. I drank up a bottle of vodka and fell asleep. When I woke up the next day, I removed the lables from the bottle and cleaned it with nail polish remover, since it was covered with label glue. I filled the bottle with water almost to the top.


Oops, sorry for including my new Epson 1400 A3+ printer in this setup description...
Exposure
Exposure was pure luck. Ended up with these settings:
Flash: SB-600, 1/8 power, 24mm zoom
Exposure: 1/250@f/8, ISO 200
Camera: Nikon D300
Lens: Nikkor 50mm f/1.8D
Shooting and post processing
I mounted the camera to the tripod and pointed it at the background. I connected the remote shutter cable and held the bottle in front of the camera, allowing it to auto focus on the bottle by pressing the shutter halfway down. I threw the bottle up in the air while giving it a little spin and pressed the shutter. I did shoot only one picture for each throw. I repeated this action about ten times, but I ended up using the first test shot.
This is the RAW file:

Look how unbelievably straight the bottle is.
In Photoshop I cleaned up the background and increased the contrast in levels. Finished with crop and sharpening.
The result:


8 comments:
Incredibly creative. Thanks for sharing that.
It's one of those photos that just makes your brain hurt while trying to figure it out.
Inventive, thanks.
Is it me, or are there a lot of phorographers out there who also play guitar?
I read the article, good article
I tried, but there's room for improvement
Results for now:
http://www.flickr.com/photos/yessod/sets/72157622404498879/
Since you're line of work involves dealing with hundreds of photos, on a daily basis, I wander if you would need a solution to eliminate the repetitive and mundane tasks (like watermarking, resizing, converting, and so on)? I humbly suggest our own solution, BatchPhoto (www.batchphoto.com). If interested please contact us from our site.
Hi Zetson, I wanted to give you a heads up on a question you asked back in Feb on this blog post: http://dustinsnipes.com/blog/2009/01/30/tutorial-photoshop-for-70-basketball-portraits-in-in-two-days/
You asked:
I have one question about step number three: Dodging and burning. You say you created a new layer, changed blending mode to Soft light and used a brush on this layer. I tried that, by painting black on the shadows and white on the highlights, but I think I’m doing it wrong. Because your screen shot of the layers palette shows a lot of gray tones on the Highlight/Shadow layer. Is there some info missing in step number three?
You were right, by the way. He forgot to mention that after he created the new layer he filled it with 50% gray (Edit>fill>50% gray). Then he used the actual dodge and burn tools to dodge and burn the gray.
I personally have never heard of dodging and burning with that particular method but... whatever! Hope that helped.
Hi Zetson,
Not sure if you received an answer on a question you posted on Dustin Snipes blog. It was about dodging and burning the basketball portraits on a separate layer. He did miss a little important step, when you creat the new layer Apple/Shift N or Ctrl/Shift N if you are a PC user a box comes up.
You need to tick the box marked "Use previous Layer to Create Clipping Mask"
Select your blending mode (Soft Light, Hard Light, Overlay etc)
Then tick the box marked "Fill with Soft-Light-Neutral color (50% Gray)"
Then use your dodge and burn tools on this layer.
I tend to make 2 layers like this called shadows and highlights as sometimes you want to tweak them separately.
Hope this helps.
You can contact me via my website if you have any other questions www.nickmcalinden.com
Cheers!!
Hello. Your blog is really great. Why did you stop posting? I think a lot of people is missing you.
Greetings from Argentina.
Good readingg your post
Post a Comment