Friday, February 27, 2009

Great news: Part deux

Today another article I wrote was featured on a website called DIYPhotography.net. I think it's been an honor to contribute to this site, since it introduced me to creative flash photography about a year ago. Prior to that I had know idea that you could use multiple flashes, or even bounce them. DIYPhotography.net really gave me the inspiration to start experimenting with light.

The article on DIYPhotography.net is about how I took this "film noir" shot. It was more difficult than it looks. Click here to read the article.

What, me film noir?


Monday, February 16, 2009

If you can't beat them, join them

This picture is not my idea, but since I saw it the first time, I could not understand how it was shot. Unfortunately I don't remember where I saw it.

While watching TV today, I got a revelation. This post is all about how I shot it.

Setup

First of all, I needed a simple picture of an umbrella. A Google search gave me that. I printed it and glued it to a piece of cardboard. With a sharp knife, I cut out the cardboard in an umbrella shape, and glued it to a piece of white paper. My wife has a lot of scrapbook equipment, so this task wasn't to difficult.


This paper would be the diffuser for this shot, with the umbrella working like a kind of inverted gobo.

I headed over to the kitchen, and set up the camera on a tripod near the kitchen bench. To leave the DoF as large as possible, I wanted to shoot vertically, or at least as much as the tripod would allow. The slave flash, a SB-600, was mounted on a microphone stand so that it would light the bench directly from above. With a teaspoon I made small water drops on the bench where the camera pointed.


The other side:


Exposure

SB-600: 24mm zoom at 1/16 power
Exposure: 1/250 sec @ f/8, ISO 200
Lens: Nikkor 35mm f/2D AF
Camera: Nikon D300


Shooting

I held the paper with the umbrella over the water drops so low as possible, without entering the camera's field of view. I wanted as much of the white paper surface to reflect in the water drops, and since they are curved on top, it required me to hold the paper as close as possible to avoid to many dark areas on the drops.


With the remote shutter cable I fired a couple of shots.

Post-processing

This is the original raw-file:


I quickly realized, after seeing it on the computer, that the umbrella spots appeared too weak. In the raw converter (Adobe Camera Raw) I increased the clarity and constrast, but no luck. I hoped that Photoshop CS4 would help me.

I added a curves adjustment layer and started messing with the curve. I wasn't too happy with the results, until I discovered the little hand symbol in curves box. With this hand selected, I could click and drag any area on the picture, which would make the color tone of that area darker or lighter. By clicking one of the umbrellas, I ended up with this curve (the hand symbol is visible on the upper right hand corner):


I'm by no means an expert in curves, so I doubt I would find a similar curve only by playing with the anchor points. I have been raised to believe that the curve should appear as a nice S, but there are exceptions, especially when my flash settings are way off... 

I finished the post-processing with a crop and sharpening.

The result:

If you can't beat them, join them

Friday, February 13, 2009

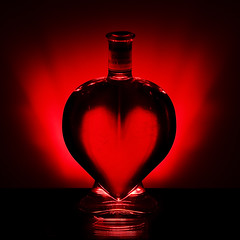
Zetson's Valentine Wine (tm)

I'm not going to lie. This shot wasn't planned to be a Valentine's Day photo. All I wanted to do was to shoot a bottle again. Luckily, the first bottle I found was shaped like a heart. It's has been laying around here for years, and today was the first time I actually noticed this shape.

Setup

I did try out several ways to light the bottle with umbrellas. I put one umbrella on each side with a green background, but I didn't think it looked good at all. It may be because of the background, but also the ribs in the umbrellas. They just show too good. I really wanted pair of softboxes! The highlights didn't work with me either. The bottle has a lot of curves in the glass, throwing reflections all over the place. Here are two examples on how ugly these photos looked:


Then I started thinking about lighting the bottle from below, removing the need for umbrellas. I took out a glass plate from one of the kitchen cabinets (that was pretty scary, having Friday 13th in mind...) and put it on top of a cardboard box. I had covered the inside of this box with black cloth to minmize the reflections. In the bottom I put a SB-600 with red color gel and a home-made snoot.


By bouncing the commander flash in the ceiling I could trigger the SB-600 in the box.

As a background I just reversed the green background, and voila, a white background I could do whatever I wanted with. I placed another SB-600 in front of this white paper, also with a red color gel.


Exposure

Backround flash: 1/128 power, 85mm zoom
Box flash: 1/8 power, 24mm zoom
Camera: 1/250 sec @ f/8, ISO 200
Lens: Tamron 90mm f/2.8 macro
Camera: Nikon D300

Shooting

I was completely surprised to see the heart-shape inside the bottle. I knew that the bottle was a big heart, but I didn't expect to get a nice heart inside it. After some trial and error, I found a camera angle that made the inside-heart look most heart-alike. (Has this sentence ever been written before?) Changing the angle and/or camera height just a little would ruin the heart, so I'm glad I found it!

This was the best shot, IMO (the raw file):


I imported the file to Photoshop and increased the contrast a little with curves and removed some of the dust spots and reflections in the glass. Finished with a crop and sharpening.

The result:

Zetson's Valentine Wine (tm)

Happy Valentine's Day!

Monday, January 26, 2009

Point of no return

"High ISO" was the title of the assignment at dps this week.

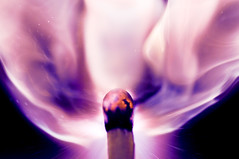
I wanted to shoot a subject where high ISO was actually needed, rather than just shooting something randomly at high ISO. Action photography is a field where high ISO is crucial. It's a low-light situation where addidontal lighting is difficult/impossible and the scene consist of moving subjects that you want to freeze. In the lack of local football matches this week, I decided to shoot an igniting match instead (pun intended). I have done that earlier, but wanted to shoot it differently this time.

Setup
I placed a non-flameable plate on the kitchen table. On top of this one, two pieces of styrofoam. I put a match in each of the styrofoam stumps so that the matches pointed at each other. I recently discovered that when the matches are placed like this, the flame is controllable to a certain degree (less luck is needed). This way the flame goes more to the sides and upwards rather than all directions at once, which was the case in my last match picture.


The camera was placed as close as possible to avoid unnecessary cropping in post-processing.

Exposure
Since the assignment said "High ISO" I had no other choice than setting the ISO to next to maximum, which is 1600 on the Nikon D300. Based on the the settings in the previous match picture, I ended up with the following exposure:

Exposure: 1/8000 sec @ f/10, ISO1600
Lens: Tamron 90mm f/2.8 macro
Camera: Nikon D300

Shooting and post-processing
I used the cable remote for the shooting. The camera was set to burst mode. I focused manually on the middle of the two matches so that most of the flame would be in focus and to avoid focus delay during the shooting. With the cable remote ready, I lit a third match and moved it slowly upwards below the two matches. The moment before they were ignited I pressed the shutter and kept it down until the flame was normal. I repeated this for about two hours, resulting in 350 useless RAW-files. Things are happening so fast during the ignition of a match, that even 6 fps on the D300 are way too slow to catch all the action. But finally, a pleasing picture appeared on the LCD-screen. This picture was quite different than all the other attempts.

The SOOC RAW-file:


The match itself is quite blurry. That was because I focuses in the middle of the matches. Shooting this close to the subject will give an extremely narrow depth of field, even at f/10. But I thought that the main subject is the flame, and not the match itself, so I approved this photo for further processing.

In Photoshop I used the selective coloring tool to give reds a pinkish hue, while making the yellows a little cooler. Then I converted the picture to LAB mode and boosted the colors using this tutorial on dps.

The result:

Point of no return

Saturday, January 17, 2009

Zetsonata Op.9 No.2

(Warning: The post you are about to read contains no in-depth descriptions.)

I have just recieved my new stage piano; a Yamaha P85. I'm very satisfied with it. The problem is that I don't know how to play it. Still, I wanted to shoot a picture were it looked like I mastered this instrument.

Setup


The flash attached to the umbrella was not used. The umbrella was only worked as a reflector to create some fill light on my head and hands.

Exposure settings
Main flash: SB-600, 1/4 power, 50mm zoom
Lens: Nikkor 35mm f/2D
Exposure: 1/250 @ f/8 ISO 200
Camera: Nikon D300

Post-processing
I wanted to make a BW picture, so I imported the RAW file to Photoshop and used the Black and white filter. Increased the contrast with levels. I also had to paint some of the kitchen details with black since the black background cloth wasn't big enough.

Result
Zetsonata Op.9 No.2

Sunday, December 21, 2008

Nearly Christmas

After I recieved a request for a setup description of my homless photo, I decided to write one. I took a couple of setup shots right after I was finished with the photo, but didn't have time to post a blog entry.

I got this idea when because of the "Christmas Decorations" assignment on dps. I tried to shoot something out of the box, not just a picture of decorations. I wanted story telling too. One day, after I was finished at my job at the airport, I noticed that one of the hangars would be a great way to shoot "on-location" portraits in the winter months. I have also thought about shooting a photo story about homeless people, and somehow I managed to mix these two ideas with the Christmas Decoration assignment.

The setup
Before driving to the hanger, I had to bring some props in addition to the camera gear. So I wrote a list over things that would make the viewer instantly recognize the situation (Christmas and homless) in the photo. This is the list:

Clothing:
- blue nylon jacket
- sweater with hood
- worn-out shoes
- worn-out jeans
- cap

Props:
- empty plastic bottles
- cardboard
- pillow
- plastic bags
- cardboard box
- loads of Chritmas decoration
- crutch
- quilt cover
- paper cups
- "Merry Christmas" card

The only thing I thought was missing was a shopping cart.

I was supposed to bring all this stuff in addition to the photo gear to the hangar, while the wind was blowing up to 60 knots. I had to walk about 50 meter between the hangar and the car, so I didn't look forward to this task. I was very close to giving up, but I thought my idea was too good to let go, so I was determined to continue.

After arriving at the hanger with all the gear safely inside, I got a very pleasant surprise. On one of the shelves I found a shopping cart look-alike. I think it was a trolley that the cleaning staff use, but it looked more than OK for the project.

I started to arrange the setup in one of the corners. It was a very elaborate job to get that look I had in mind. With the Christmas decorations it almost felt like I was decorating a tree. After about 30 minutes of fine tuning, I got this:


(After I shot the picture above, I added the bag, bucket and the cardboard box. I also found an old vacuum cleaner with some appropriate colors which I placed by the wall.)

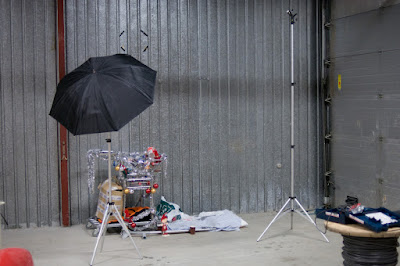
The light setup was pretty simple. Inspired by Dave Hill and Jill Greenberg I wanted to shoot a kind of subtle "artistic" photo, so I planned to use bare strobes. However, after some test shots, I realized I had to use an reflective umbrella to light up the trolley, since I got too many harsh shadows from that strobe. (It was too evident that it was an arranged picture). This is how the final setup looked like:


I attached the camera to the tripod and started adjusting the exposure.

Exposure
There were a lot of grey tones in the scene, so was just adjusting the flash power equally on both strobes until I got a clean histogram with a peak on the middle. The light in the hangar was pretty warm and ugly, so I used minimum sync speed for the shutter to block it out, while using a narrow aperture to get most of the things in focus.

Final exposure settings:
Bare strobe: SB-600, 1/8 power at 24 mm
Umbrella: SB-600, 1/4 power at 24 mm
Exposure: 1/250 sec @ f/8, ISO 200
Lens: Nikkor 50mm f/1.8D AF
Camera: Nikon D300
Flash sync: Optical with SB-800

Shooting and processing
I tried a lot of different poses for this shot. I was uncertain how to behave. I tried laying down while sleeping, sitting with my head hung down, and looking at the trolley. It was a lot of walking back and forth. I had to trigger the 20 sec timer for each shot, so I got a great leg exercise out of it. Finally I found that the looking tired and unhappy at the camera was the best. I looked dead in the other poses.

This is the best shot, unedited RAW file:


In Adobe Camera Raw I increased the clarityto about 50, the vibrance to about 20 and corrected the white balance. Luckily, the exposure was spot on.

In Photoshop I did this:

1. Duplicated the background layer and changed the blending mode to Soft light.

2. Added a high-pass filter (radius 44) on the Soft light layer and reduced the opacity to 70%. This created the slightly artistic look.

3. Used Surface blur on the Soft light layer to even out the surfaces while preserving the edges.

4. Lowered the master saturation a little while increasing the reds to make the decorations stand out.

5. Cropping, vignette and sharpening.

This is the result:

Nearly Christmas and a (hopefully) New Year

Surprise from above

Inspired by winning the "Christmas Decoration" assignment on dps, I wanted to try a selfportrait including fairy dust, a Photoshop techinque I learned earlier this day.

The setup
I hung a green cloth on the wardrobe and placed a SB-600 on lightstand in front of it, about 40 cm from the door. This was background lighting.


The camera was mounted on a tripod. Right next to the camera I placed another lightstand with a snooted SB-600 on top, pointing down at were my face would be.


Exposure
Since the background flash was pretty close to the surface, I entered the lowest flash output on this one. For the main flash I held up a white sheet of paper and checked that the highlights didn't blow out on the histogram on the camera and adjusted the main flash accordingly.


I also used a narrow aperture to get as much of my face in focus. I shot with the timer on the camera, so I had to lock the focus prior to shooting by focusing and the lock it.

Final exposure settings:

Background flash: 1/128 power, 24 mm zoom
Main flash: 1/8, 85mm zoom
Exposure: 1/250 sec @ f/11, ISO 200
Lens: Nikkor 25mm f/2D AF
Camera: Nikon D300
Flash sync: Optical triggering from the camera

Shooting and processing

Finding the right facial expression and the positioning of the hands was the hardest part. After 30 or so shots I got a pleasing shot. This is the RAW file - straight from the cameram with no editing:


In Adobe Camera Raw I increased the clarity slider to about 50, adjusted the white balance a little before I sent it to Photoshop, where I did the following:

1. Added surface blur to entire image to soften the skin while preserving the edges.

2. Dodged the highlights and burned the shadows, both on the skin.

3. Duplicated the layer and added a high-pass filter on the new layer. Changed the blending mode to Soft Light and reduced the opacity a little.

4. Selected the greens with the Color Range tool and blurred it almost maximum to even out the wrinkles on the green cloth.

5. Covering some of the green background with black to make it more uniform.

6. Created the fairy dust using this Photoshop tutorial. (I'm sure I could have done it better than what I did in my photo, but my sketching capabilities are at level 0...)

7. Cropping, flattening and sharpening.

The result:

Surprise from above

John Brainard: Yes, I finally managed to put together a new blog entry before Monday, LOL.

Tuesday, November 18, 2008

Theory of Relaxitivity

This week's dPS assignment whispered gently "relax".

Getting the idea
For weeks now I've wanted to shoot something which I could cross-process, but so far my subjects have not looked good in offset colors. When I read about the assignment, I got the idea instantly; a dreamy, cross-processed high-key selfportrait of me listening to music. Would it work this time?

The setup
It was time to move my gear out of the computer room to the living room. The spot which I chose for shooting was right in front of the TV set so I had to be quick. My wife wasn't willing to listen to the radio the rest of the evening.

During the clearing of our closet yesterday I found a large white wooden plate. This was perfect for the shot. I placed it on the arm rest on the couch and placed a carboard box underneath on the other side. I mounted a translucent umbrella on a light stand with a SB-600 flash and another SB-600 (backlight) behind the plate (It's hidden behind the camera on the setup shot below):


Here's the backlight flash, pointing upwards along the wall.


I put on a blue color gel. The shot I had in mind would have a slight colored background, so I picked the blue randomly. It turned out to work just fine.

The camera was mounted to a tripod. I originally inteded to shot it myself with the remote, but finding the right head position was EXTREMELY difficult even with a mirror so I had to ask my wife to take the pictures. I took on a headset and layed my head on the plate, right above the couch's arm rest. I also had to place another umbrella under my chin for fill light. Please overlook my feminine pose in the shot below:


Exposure
Finding the exposure was easy in this shot. Similar to my Leaf Diet shot I had to deal with almost white surfaces. Using the histogram on the camera I could increase the main flash's output until the curve ended up right below the over-exposure mark. (You can find an in-depth explanation on this in the Leaf Diet shot above). The output on the back light flash was reduced with one stop lower than the main flash. I also wanted to block out all ambient light, so I chose the max. flash sync speed on the camera:

Final settings:
Main light: 1/8 power at 24mm zoom
Back light: 1/16 power at 24 mm zoom
Exposure: 1/250 sec, f/5.6 and ISO 200
Lens: Nikkor 35mm f/2 AF
Camera: Nikon D300

Shooting and processing
I told my wife that I wanted my head to point directly on the camera and she instructed me accordingly. As mentioned I held the umbrella with one hand, and streched the headset cord with the other. After about 30 shots we got a shot we were pleased with. This is the SOOTC RAW file:


Since the exposure was figured out, I only had to adjust the whitebalance in Adobe Camera Raw.

In Photoshop I adjusted the curve slightly in each RGB channel according to this cross-processing tutorial on the dPS forum. I also had to increase the contrast in Curves, making a slight S-shape, but still leaving it a little faded. I also added a light vignette and cropped it a little.

The result:

Theory of Relaxitivity

Aftermath
The head pose that looked the best was very unpleasant since I had to force my sholder into the arm rest and hold my neck in an awkward position, with both hands occupied. It also felt kind of strange, because it felt like I was looking down on the floor, away from the camera. Of course, the autofocus wouldn't work everytime because my face was too dark and the AF illuminator wouldn't light up. I had to keep my head still in an uncomfortable position for "long" periods of time to get the shots. So, even if the picture depicts "relaxing", the circumstances was not relaxing at all. It actually wore me out, giving me a nasty headache... This is another example that pictures don't always tell the truth.

Another "fun" fact: While I was processing the photo, I noticed that my wife was wandering back and forth, looking for something. I didn't bother asking since I was so occupied. After the editing was finished I walked back to the living room to take the setup photos. After sometime I just had to ask my wife what she was looking for. It turned out to be her wallet.

I had to plead guilty at once. In order to get the wooden plate horizontal, I had to build up a support of a cardboard box, some books and a.... wallet.


Sunday, November 16, 2008

Warhol's Light Bulbs

I didn't plan to shoot light bulbs so that they looked like an Andy Warhol creation, but when you don't have a plan for your work, you just got to accept whatever result.

Getting the idea
I thought the Still-life set on my Flickr stream needed a little punch in terms of colors. I have a couple of cloth backgrounds with different colors and wanted to use them. Of course I needed a foreground object as well and the first thing I found was a light bulb. Fair enough.


The setup
I placed the 40 watts light bulb in the midde of the room and hung a cloth background about 1 meter behind it. I pointed a SB-600 at the background, placing it as close to the light bulb as possible to avoid shadows on the background caused by the uneven background cloth (no, I didn't do any ironing this time either). I mounted the camera as close I could get on a tripod and connected a remote control.


Exposure
The problem was that the light bulb was too bright. At minimum x-sync speed shutter at 1/250 and f/45 I got a pleasing shot of the inside of the light bulb, but I didn't get any background color. The SB-600 was just not powerful enough.

But after connecting a IKEA dimmer things changed to the better. Using the lowest setting on the dimmer I could open up the aperture a lot, making the flash useful again. I reduced the flash power to 1/8.


This is the edited version of the photo.

Light bulb

I thought it was an OK shot, but not as colorful as I wanted it to be. So I moved the camera to get the whole bulb within the frame and rotated it to portrait orientation. Since it wasn't as important to get the whole tungsten thread in focus I could open up the aperture even more and reduce the flash power again.

Final settings:
Light bulb: Minimum power, according to IKEA
Flash: 1/128 power at 24mm zoom
Exposure: 1/250 @ f/4, ISO 200
Lens: Tamron 90mm f/2.8 macro
Camera: Nikon D300

Shooting and processing
I shot one shot of the light bulb with a different background for each. It was during this I started thinking about Andy Worhol's work (collage of the same object in different colors). I did a reshoot, making sure that the camera didn't move. As mentioned I used a remote control for extra protection.


With four images of the same light bulb with different colors I imported them to Adobe Camera Raw and increased the exposure by 0.7 stop. The only editing I did in Photoshop was cropping, cutting and pasting (and a whole lot of cloning to remove the speculars from the commander flash on the camera, but that's another story).

The result:

Warhol's Light Bulbs

The coloring could easily been done in Photoshop too, but it was kind of fun to this the hard way, like Warhol:)