The setup
I hung a green cloth on the wardrobe and placed a SB-600 on lightstand in front of it, about 40 cm from the door. This was background lighting.
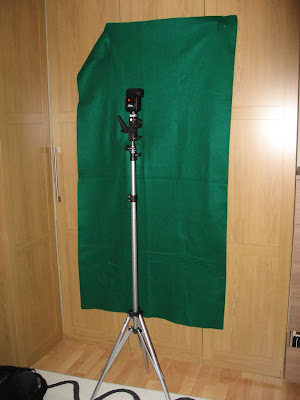
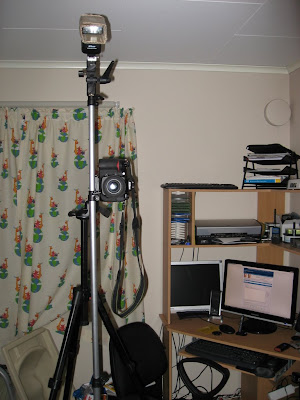
The camera was mounted on a tripod. Right next to the camera I placed another lightstand with a snooted SB-600 on top, pointing down at were my face would be.
Exposure
Since the background flash was pretty close to the surface, I entered the lowest flash output on this one. For the main flash I held up a white sheet of paper and checked that the highlights didn't blow out on the histogram on the camera and adjusted the main flash accordingly.

I also used a narrow aperture to get as much of my face in focus. I shot with the timer on the camera, so I had to lock the focus prior to shooting by focusing and the lock it.
Final exposure settings:
Background flash: 1/128 power, 24 mm zoom
Main flash: 1/8, 85mm zoom
Exposure: 1/250 sec @ f/11, ISO 200
Lens: Nikkor 25mm f/2D AF
Camera: Nikon D300
Flash sync: Optical triggering from the camera
Shooting and processing
Finding the right facial expression and the positioning of the hands was the hardest part. After 30 or so shots I got a pleasing shot. This is the RAW file - straight from the cameram with no editing:

In Adobe Camera Raw I increased the clarity slider to about 50, adjusted the white balance a little before I sent it to Photoshop, where I did the following:
1. Added surface blur to entire image to soften the skin while preserving the edges.
2. Dodged the highlights and burned the shadows, both on the skin.
3. Duplicated the layer and added a high-pass filter on the new layer. Changed the blending mode to Soft Light and reduced the opacity a little.
4. Selected the greens with the Color Range tool and blurred it almost maximum to even out the wrinkles on the green cloth.
5. Covering some of the green background with black to make it more uniform.
6. Created the fairy dust using this Photoshop tutorial. (I'm sure I could have done it better than what I did in my photo, but my sketching capabilities are at level 0...)
7. Cropping, flattening and sharpening.
The result:

John Brainard: Yes, I finally managed to put together a new blog entry before Monday, LOL.


2 comments:
Seems you've held up your end of the bargain! And a fantastic job at it you did. You certainly have a creative knack toward self-portraits. I've enjoyed them.
Looks like I gotta get busy! I have the perfect subject. I just gotta figure out what to do with it.
Fantastic! Keep up these posts, I enjoy reading about your techniques. I intend on trying some of them out soon!
Post a Comment